Creating a Beautiful Bench Seat with a View
One thing that Karma and I have learned time and time again when building a van, is to have multiple projects going at once. That is why this post is about the beautiful bench seat that Karma created. I really only helped minimally, Karma was the brains of this operation.
Inevitably while building a van, you will:
- A.) Order something wrong and have to wait for it in the mail/massively backordered.
- B.) Forget to order something and have to wait for it in the mail.
- C.) You have to stop project 1 to build part of project 2 in order to finish project 1.
- D.) Or several of the above at the same time.
Why Build the Bench Seat Now?
Karma took the lead on this project for several reasons. First, he has way more wood building experience than I do and knows how to work the various saws well. Second, we came to an impasse on several projects, and I needed to do quite a bit of research. I tend to be the thorough researcher and Karma tends to be the doer.
This meant that this project was a great one to start and work in between other big projects. Karma worked on it for quite some time. As he did that, I dove into the intricacies of the electrical wiring, the electrical system components, and ordered much of our propane system.
He problem solved his way through the bench seat like a pro. Now, wait…it’s just a box right? Wrong!
Location Choice
After our initial layout changes, the bench seat landed on the passenger side of the van. The bed comes in 54” from the back. To have a bench seat that will fit two of us side by side, we would have half of it in front of the sliding door.
This serves two main purposes. One, it allows us to keep the sliding door primarily open while still using that space. A lot of recent van builds have located the sink or the stove in a cabinet blocking half of the slider. That was our original plan until we placed the fridge and stove in that location. And, it just did not feel right. However, putting a bench seat there allowed us to use that space while keeping the view more open. In fact, it created a much more open feeling through the whole space.
Second, when combined with our passenger swivel seat, the bench seat can function as a dinette for eating or working. But, if we have the slider closed, we can also sit side by side. We’ve also seen a lot of van builds that build a dinette right next to the bed with a pullout table. This seems cool, but we both feel trapped in those situations. If we were both eating and one had to stand up, where do you put the food as you slide the table in to get out?
Why the Bench Seat is NOT Just a Box
The easy answer to why it’s not a just a box is: because it’s in a van!
The real answer is a bit more complicated. When we discussed what made small spaces feel comfortable, we came up with openness. That shifted the bench where we placed it by the slider. Then, small things came up, like having a toe kick.
When you walk around a house, especially in your kitchen, toe kicks allow you to comfortably move in the space. Toe kicks allow you to open cabinets over your foot, open the fridge, and even stand close to a counter. Get into a space without one, and I guarantee, you’ll notice something as “off.”
Since our van kitchen hallway will be fairly narrow, we wanted a toe kick. That way, we can pass each other more comfortably.
Next, because the bench seat stretched into the slider doorway, the back of the bench seat had to be longer for that portion. The bench seat would need stabilization from the step up into the van. This creates a small cubby in the step up. Luckily, we knew this and extended the furring strips and the subfloor to help support it. If you’re curious, the subfloor was Conversion Entry 6.
Lastly, we had to work around a protruding pillar next to the slider. This meant that Karma had to figure out how to make all kinds of weird cuts and measurements to get it to fit properly. It was a headache and a half.


Ventilation
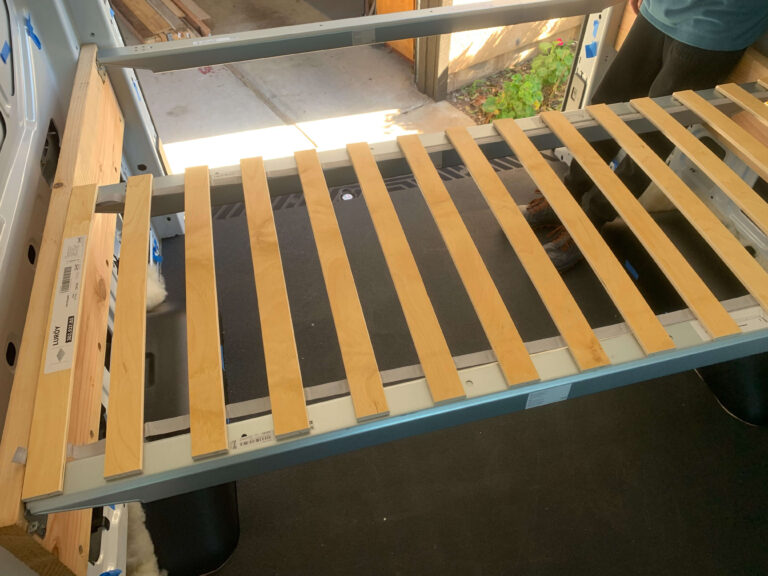
Here’s where we did something a little different than many van builds that we’ve seen. Just like the bed will rest on slats, so will the bench seat cushion. We know from experience that you can almost never get enough ventilation. Therefore, we will try to build it in structurally where we can.
Karma had a set of very old Ikea slats from his old apartment stored in the garage. We did not use them in the bed because they don’t have the upward flex that the new ones have. Karma pulled those down and reused them as bench seat slats. That way, air can circulate a little better around the cushion (whenever we make that).
Throughout the bench seat, Karma managed to use several old wood scraps. It was not entirely reused wood, but he did where he could.


Piano Hinge
We also opted for a long piano hinge to open the whole seat at once. This seems like a great idea until you find only gold 48″ piano hinges locally.
I got online for Karma and found a boat outfitter in Florida who had silver ones. Not only did they have silver piano hinges, they would cut them to the exact size you needed. Even up to the half inch!
They were convenient and shipped fast!


We Did Buy a New Tool for this Project
We realized that we were in over our heads hand sanding things. Karma’s Dad’s sander was broken and sanding by hand was just not cutting it.
So, we picked up a $45 dollar sander and it saved Karma’s arms. He got ridiculously good at sanding while making this bench.
We needed one anyway. This project is just the one where we deemed it fully necessary.

What Kind of Storage Does the Bench Seat Have?
Karma designed the bench seat to have as much storage as possible. He kept it open in the center, so we have plenty of space to store all sorts of things. Currently, we’re thinking it might house some heavier food items since we won’t have much lower cabinet space. We were also thinking it might be a handy location for day hike packs.


Finishing Steps
We added some water proofer to the bench seat for some protection in the meantime. We plan to use some Total Boat Halcyon clear gloss over the sides. This will prevent more scratches. But, as usual, we’re waiting for more in the mail.
It rests in the van right now, but we have not fully secured it just yet. Are you ever really fully finished with a van project? Probably not.