Simple Vancillary Shelf For A Ford Transit Van
Why We Want a Headliner Shelf
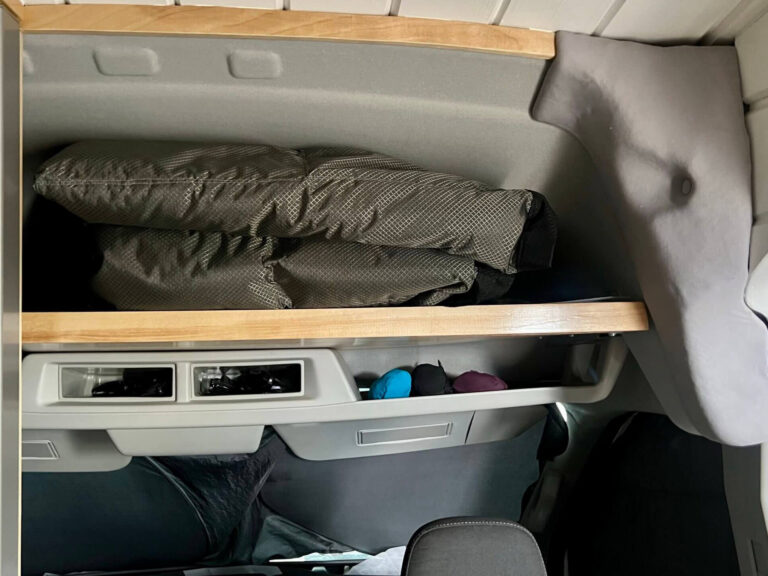
A headliner shelf is a large shelf that sits above the driver and passenger seat. Ford has a tiny, inefficient OEM shelf there. But, it sucks. It totally sucks, actually. Anytime we place something up there, it manages to fall on us while driving. That’s why we bought the Vancillary Shelf kit for a Ford Transit.
Not only does the OEM shelf suck, but there is a large amount of space that is otherwise wasted. When the van itself has such a small square footage, every nook and cranny counts. If we place a large shelf up there, it reclaims the space.
The main thing about any shelf placed above the cab is that it won’t every hold a lot of weight. Shelves have multiple points to connect and secure to, but not for heavy things.
And, let me tell you…we have so many Melanzana sweatshirts that they need their own shelf. We literally live in them every day. I am utterly sad without a selection of them.
We had a headliner shelf in our last van, Glen. However, all the old Ford Econoline vans had them that had high roof conversions. The old conversions literally cut a giant hole off the roof and attached a fiberglass top. For that structure to work, they had to keep the original roof over the cab. This created a need to make a shelf there to hide it. Needless to say, we used that shelf ALL THE TIME. It mostly held…our Melanzanas.
What is a Vancillary Shelf?
A Vancillary shelf is a great, relatively new alternative to other very expensive options. Why is it relatively inexpensive? Because it is a DIY kit.
The DIY kit includes: 2 perfectly shaped z brackets, a template for the shelf and header, as well as all the screws, washers, and nuts.
It does not come with the actual shelf. That, you can purchase or reuse any wood you’d like. You just lay it out on some sawhorses and carefully add the provided template. Then, bust out the good old jigsaw.
This kit really saved us a lot of headaches and “oh f**ks.” Van building has a lot of “oh f**k” moments and this one has had few to none.
The price paid for the kit really covers the ultra specific, lightweight metal z brackets that fit perfectly. I really don’t think they could have engineered them better. Once you purchase the kit, you can download a PDF with all the details. These were amazing specific. For example, they specified which drill bit to use for which hole. I can’t tell you how many DIY projects completely forget to mention the drill bit size they used. They have corresponding pictures in case the pretty blatant text is not enough.
Vancillary Shelf VS Other Headliner Shelves
So, why choose the DIY kit? Well, this simply came down to price. The leading other options are in the $450-500 range. The Vancillary Headliner Shelf Kit costs $129.95.
The other shelves that come precut are made of metal. Yes, they are solid and well built. Yes, they come will all the hardware you need. I understand they had to get pressed in a machine which costs money. But, $500? I did not want to drop that for a shelf.
Even if you get a really fancy piece of plywood for the DIY shelf, you’re still looking at under $200.
After having completed it, I’d say it’s worth the money simply for having something with good directions. It definitely beat the directions included with the Scopema Swivel Seat, the MaxxAir Fan, and the Alurack.
How to Build Your DIY Vancillary Shelf for a Ford Transit
Step 1:
We started by reading the directions that came with the kit. The Vancillary peeps wrote them very clearly, but we went to YouTube afterward to see an example. There, we found lots of videos on the Sprinter Van Vancillary Shelf, but none on the Ford Transit. Cutting out the shelf is almost the same, but the brackets are very different.
Step 2:
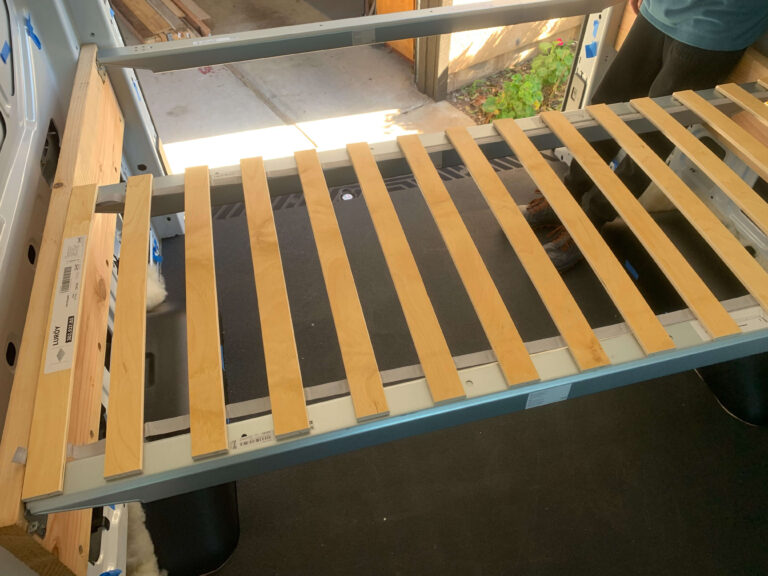
We grabbed a piece of ½ Birch Formaldehyde Free plywood that we already had. Laying it over a few sawhorses, we picked the corner with grain of the wood we liked the best. This side would end up as the side we would look up at from the cab seats.
We wanted to make as few jigsaw cuts as possible, so we used the squared off corner. Grabbing the template, we cut the paper according to the directions. We left about a ½ inch around the lines.

Step 3:
We very carefully laid out the template. Following the directions, we attached the template using clear packing tape. Since it comes folded to fit in the box, it takes some time to flatten it out.

Step 4:
With the template on tight, we grabbed the trusty jigsaw. Really, Karma grabbed the jigsaw and I applied weight to the plywood. We’ve gotten into a pretty good rhythm of it.
Karma used the jigsaw to cut along the line right through the tape. It worked just as the directions said: completely fine.


Step 5:
We opted to grab a piece of birch in the store that was ¾ inches by 1 ½ inches. It was one of the buy-by-the-foot pieces near the trim section. We picked it by its straightness and the color pattern. While we liked the plywood design, this seemed like one small way to make it look a little cleaner.
Gluing it to the front, we used four giant clamps. We’d been putting off getting a few 24-inch and 36-inch ratcheting clamps. However, we gave in for this project and found it worth it.


Step 6:
Next, we installed the classy looking z shaped brackets. This went surprisingly smoothly. The directions were on point. That is extremely rare in van projects.
We carefully used a socket wrench to loosen the bolts holding in the existing headliner shelf. Doing one side at a time, we could easily slip the bracket on and retighten the bolts. The brackets fit like gloves.
Here, we also pulled out the center boxes that hold things like sunglasses. That took a second to figure out, but was relatively easy. Pulling out those boxes revealed an existing bolt hole that we would need.


Step 7:
We grabbed the shelf after the glue dried and slipped it onto the z-brackets. We marked the holes just as the instructions suggested again. It went very smoothly. We made it slightly harder using a plywood board that had a small warp to it.
Pulling the shelf back out, we used the drill bits the directions suggested to make the bolt holes. I cannot begin to explain how helpful it is when directions specify these things. Huge high five to that decision.

Step 8:
With the drill holes made, Karma ran over the shelf with the sander to make it extra smooth. We cleaned it with a damp towel afterward.
We opted to grab some Total Boat Halcyon Clear Gloss to finish it. Karma has been watching tons of videos by Woby Design and was inspired to try it.
Of course, we watched a few different videos for tips on applying it with a foam brush. These were somewhat helpful.
Ultimately, we learned a few things. First, although you can apply it between 50-90 degrees Fahrenheit, it really works the best in 50-70 degrees. I think it dried a little too quickly before it self-levels in the hotter temperatures. Second, long brush strokes the entire length work best. Don’t use it like a paintbrush. Use long strokes with the grain of the wood. Third, we found it easier to pour about the right amount into the cup, then pour it onto the wood in a wavy pattern. This helped keep up the long brush strokes. Right when the foam brush ran out of gloss, it would pick up more.
We added three coats to each side of the Vancillary shelf. It took awhile since we had to wait an hour between coats. We also waited overnight before flipping it over.


Step 9:
Installation! We grabbed the silky smooth shelf and placed it in the van on the z-brackets. Grabbing the provided hardware, we attached it easily. The whole project went as the directions said it would.
Overall, 10 out of 10 would recommend the Vancillary Headliner Shelf for the Ford Transit.