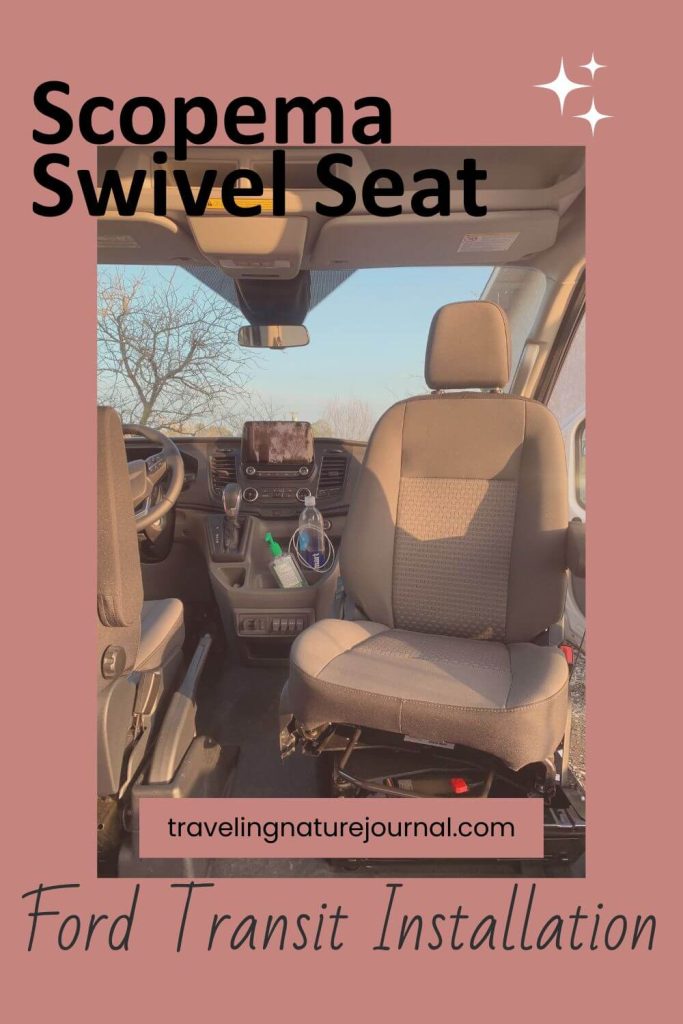
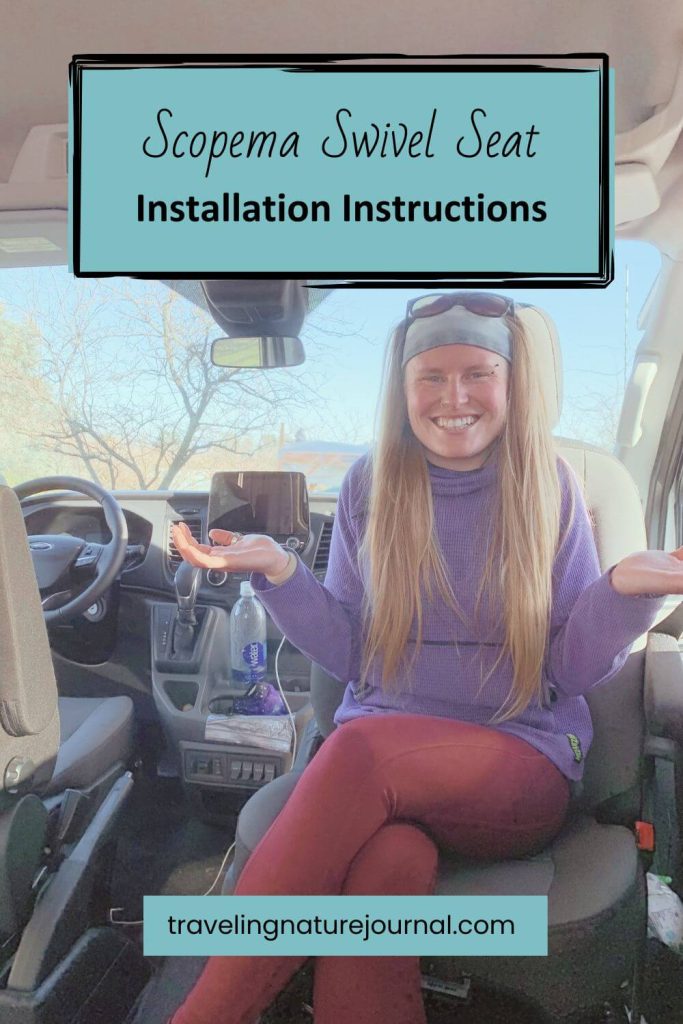
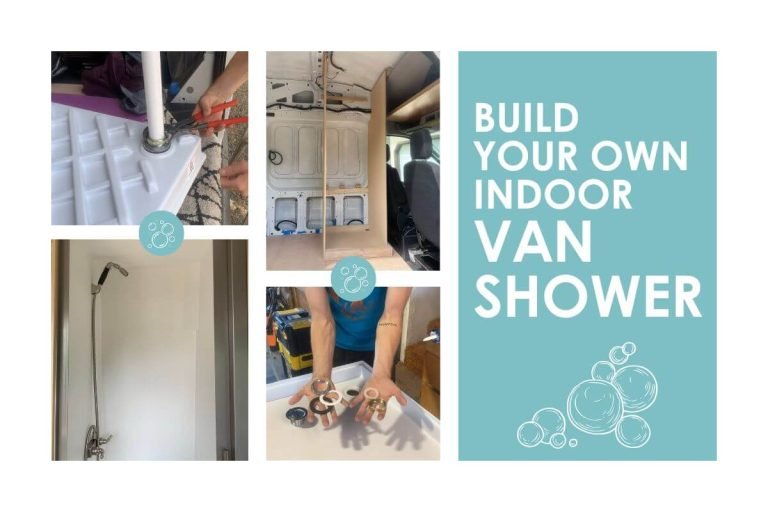
Scopema Swivel Seat: Lowest Height and Easy Instructions
Building a van is DAUNTING. That’s why you should consider installing the Scopema Swivel Seat as your first DIY van build project!
Not only is it a one-day project, but the Scopema Swivel Seat has the lowest height on the market.
My partner and I spent 8 months building our dream van for a couple living and working on the road. However, this was one of our only one-day projects.
If you’re looking for a good place to start, grab yourself a Scopema Swivel Seat and install it into your passenger seat. These directions are specific to a Ford Transit, however, it’s a similar process on both the Dodge Promaster and the Mercedes Sprinter vans.
We’ve now used the Scopema Swivel Seat for 3 years of van life, and it still works wonderfully.
This post contains affiliate links. If you purchase a product or book through these links, I can make a small commission at no cost to you. It helps me to keep writing helpful guides.
List of Contents
WHY Add a Swivel Seat and WHY Scopema?
There is one main reason to add a swivel seat to your DIY van build: increased space.
When you simplify a space, the space you have must become multipurpose! Having done this for years with our thru-hiking gear, this made sense to us.
Adding a swivel seat is like making the passenger seat a multipurpose item in your thru-hiking backpack.
WHY A SWIVEL SEAT?
First, a swivel seat can dramatically increase your parked living space. If you’re a couple like us, adding a swivel seat can double your sitting space.
Personally, we chose to have a fixed bed. That decision directly influenced our decision to have a swivel seat. Why? Because we only like to sit on the bed with relaxing activities (not work). And while the bench seat is big enough for the two of us, we often want two spaces. Thus, the space doubles from the swivel seat.
WHY A SCOPEMA SWIVEL SEAT?
The Scopema swivel seat has two main advantages over other swivel seats on the market.
First, it has the lowest added height. This is incredibly important if the person who often sits there is short. At 5’2”, this is incredibly important for me. I can sit on the Scopema Swivel Seat, and my feet touch the floor!
Second, many other swivel seats seemed to have significant installation issues. We did countless hours of YouTube and blog research, and the Scopema Swivel Seat appeared to have the fewest installation issues.
Also, if you are reading about this and thinking about getting a van, here are two helpful resources for you: How to Buy the Ultimate New Van and How to Buy A (New to You) Used Van.
➡️ If you buy any swivel seat from The Swivel Shop, use code “VEGGIE” for 5% off!
Tools Needed to Install the Scopema Swivel Seat
With every van project, it’s important to know what tools you need before you begin the project.
If you don’t have another vehicle to go to the hardware store, you could get yourself in a pickle. Even if you have another vehicle, it can get very frustrating to pause and head to the store.
These are all the tools that we used to install the Scopema Swivel Seat on the passenger side of our Ford Transit.
For reference, we have a Ford Transit with a high roof, a 148-wheelbase, and an AWD van. However, the only applicable piece of that for the installation of the Scopema Swivel Seat is that it’s a Ford Transit.
**Make sure you get the Scopema Swivel Seat meant for YOUR van. The seat base screw holes are actually different on each model.**
Tools You Definitely Need:
- Ratchet and Sockets sizes 7mm &13mm
- Allen Wrench
- Metal Saw
- Metal File
- Drop Cloth/Trash Bag
- Shop Vac
- Black Gloss Rustoleum (or whatever color your seat base is)
- Swivel Seat and included hardware
Tools You Might Need:
- Your vehicle’s included jack
- Something smaller than the jack like wood blocks taped together (see photo)
Step-by-Step Instructions to Install the Scopema Swivel Seat
Here are the step-by-step instructions to how we installed a Scopema Swivel Seat on our Ford Transit.
Disclaimer: I am not an expert and these instructions are based solely on my personal experience. Use at your own risk.
Step 1
Assemble the tools listed above. It’s the absolute worst not to have something that you need later. No one wants to stop a project halfway through and go to a hardware store. Or worse…, you need to order it and wait for it to get delivered!
Obviously, make sure you order the correct Scopema Swivel Seat for your build.
Step 2
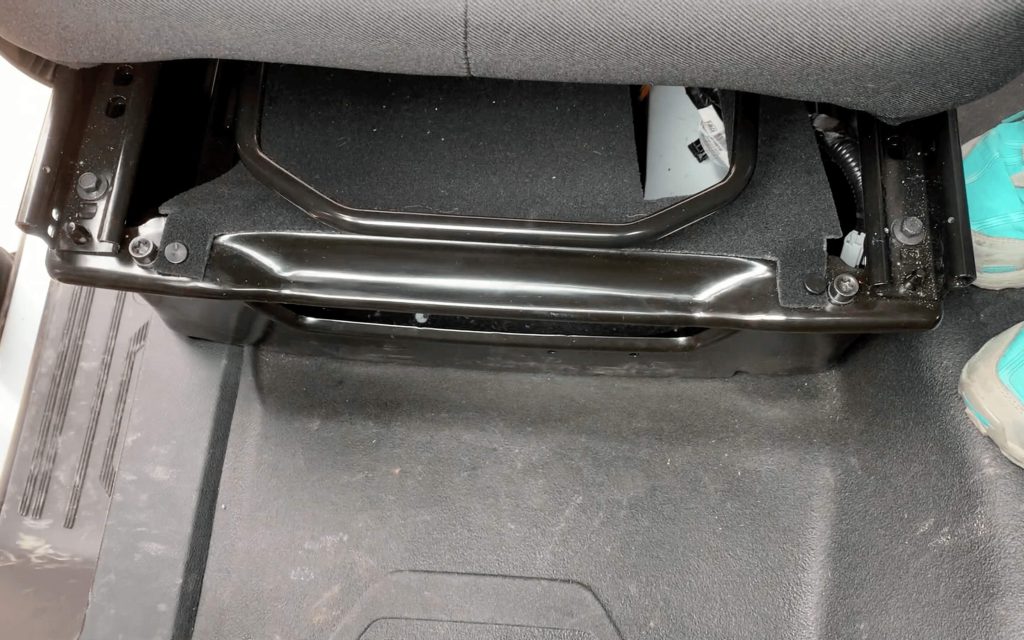
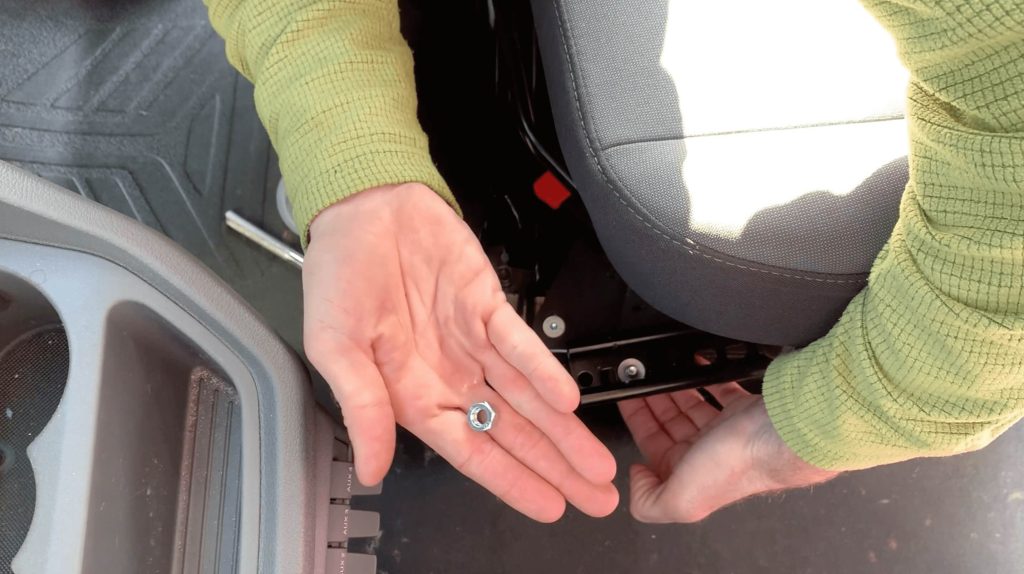
Identify and remove the four bolts that hold your passenger seat to the base. You will need a 13mm socket for this. Be careful not to yank the seat around, as it is still attached to the airbag underneath.
Place the bolts in a handy location to retrieve them later. We use a Tupperware container with a lid. You’ll need these again for the final steps of installing your Scopema Swivel Seat.
Step 3
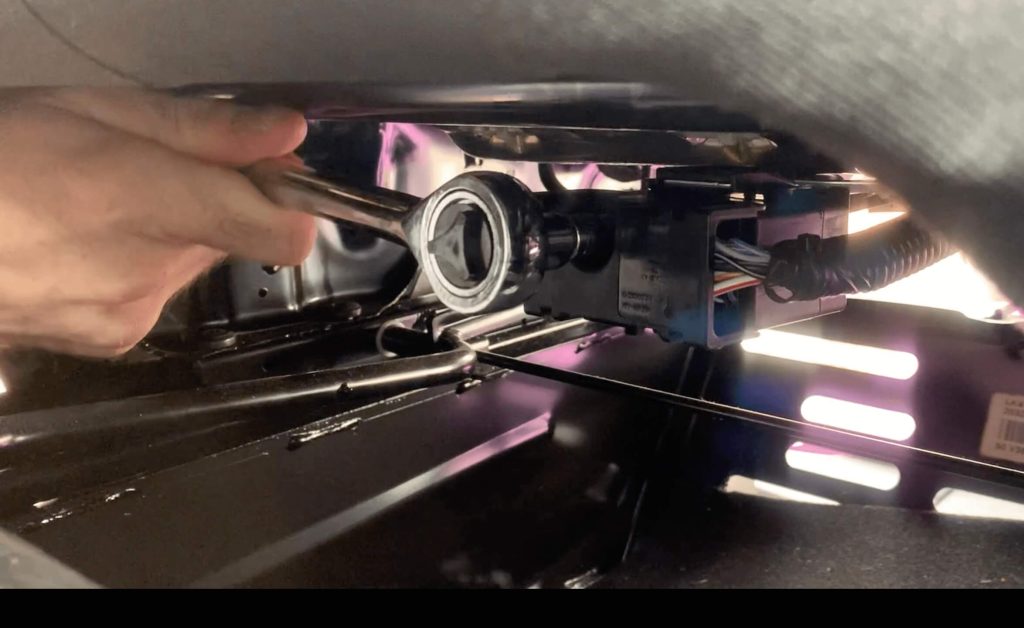
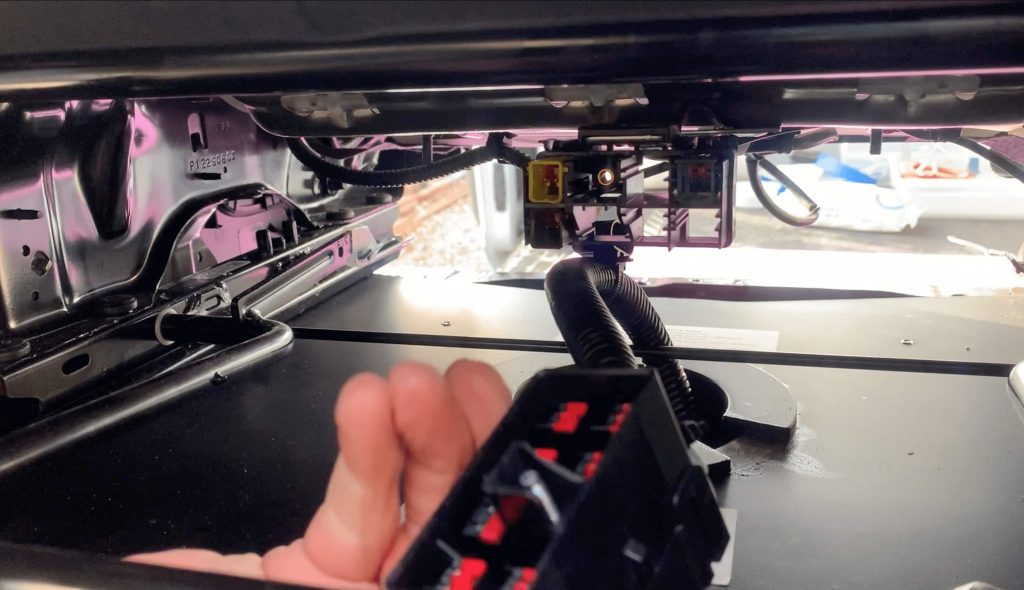
Locate the airbag connection underneath the seat in the center. Reach underneath from the front of the seat with a 7mm socket and loosen that bolt.
Undo this connection once the bolt is loose, and gently place it in the seat base. You may have to tilt the seat up in the front to use the ratchet.
Take your time here…that airbag is essential!
Step 4
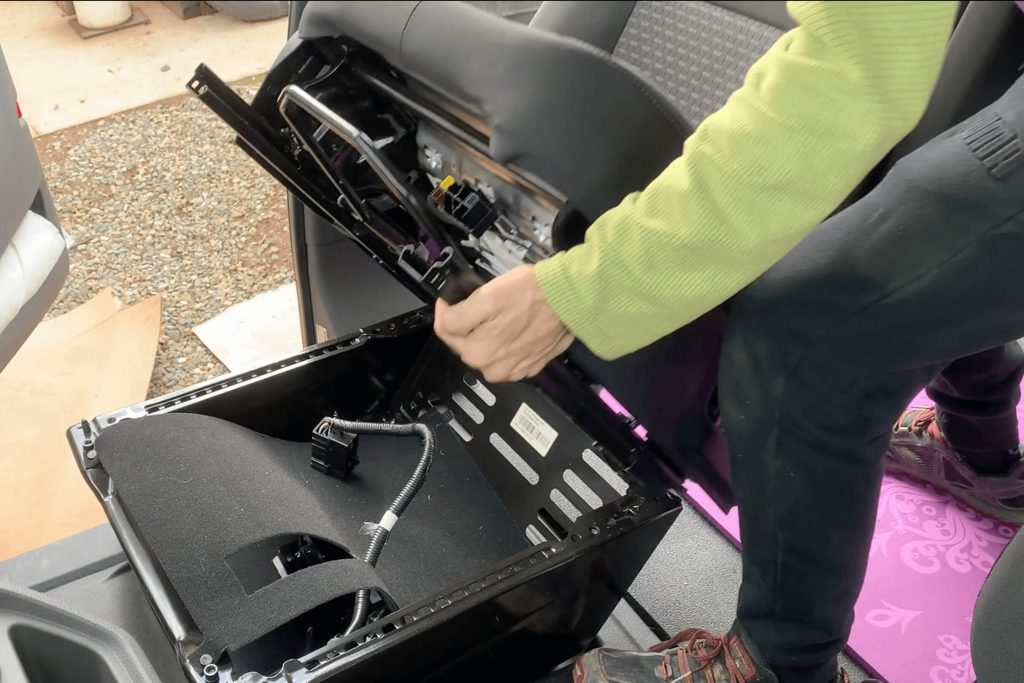
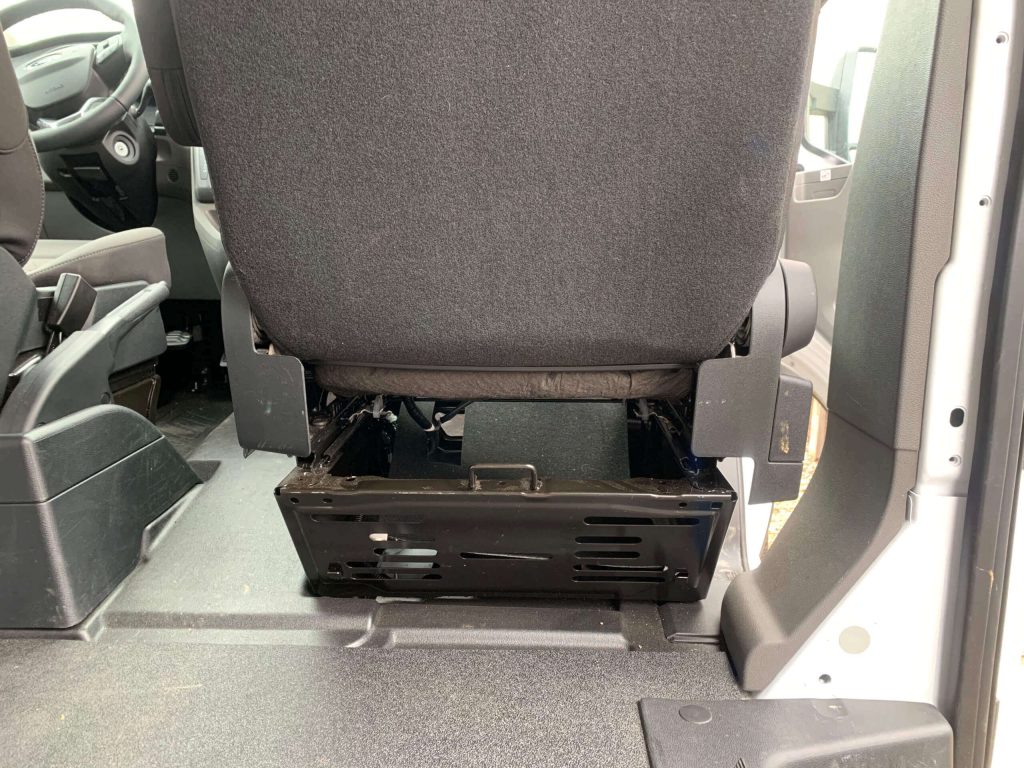
Carefully remove the seat and place it behind the seat base in the van.
It will still be connected to the seatbelt!
It’s easier to leave the seat and seatbelt attached than to remove and re-add the parts later. The seatbelt stretches long enough that you’ll have enough space to work on your Scopema Swivel Seat installation.
Step 5

Align the swivel seat on the seat base.
The red handle on the Scopema Swivel Seat goes toward the front of the van.
Use that red handle to swivel the top level of the swivel seat to 45 degrees.
This will allow you to correctly see the alignment of the bottom level of the swivel to the seat base.
Step 6
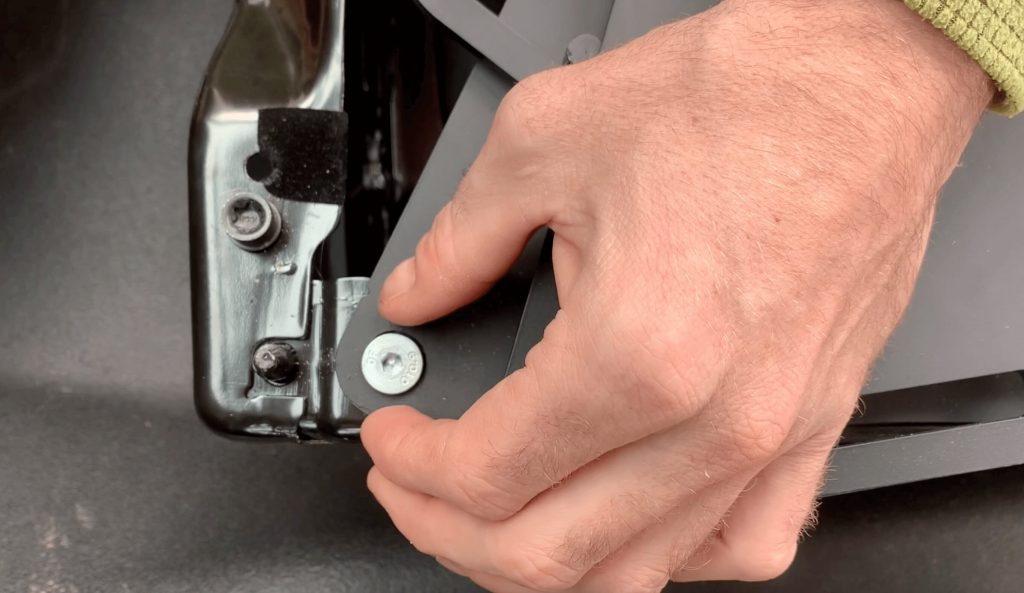
Use the four bolts that came with the swivel seat to gently align the bottom layer to the seat base with the Allen wrench.
Begin to hand screw these in loosely.
You may have to jockey the seat around some to get them to align correctly. If one hole is not lining up properly, unscrew the bolts and try again.
If they all screw in, WOOHOO! Skip to Step 7!
If they do not all screw in correctly, continue to Step 6a.
Step 6a
So, what happens if one bolt won’t line up?
First, don’t force it and strip the screws!
I’ve seen in other YouTube videos that, for some reason, the 4th screw doesn’t line up precisely on the Ford Transit 2020 with the Scopema Swivel Seat.
However, it does not seem to have this problem with other years of Ford Transits.
Why did it happen? I don’t have that answer.
But, I wouldn’t say I liked any of the solutions I saw on YouTube. Mainly, the other option seemed to be using a drill to increase the bolt-hole size on the Scopema Swivel Seat.
Instead, Karma developed an innovative solution that does NOT rely on a drill. This is where the “tools you may need” come into play.
⚠️ **BE VERY CAREFUL DOING THIS and DO SO AT YOUR OWN RISK** ⚠️
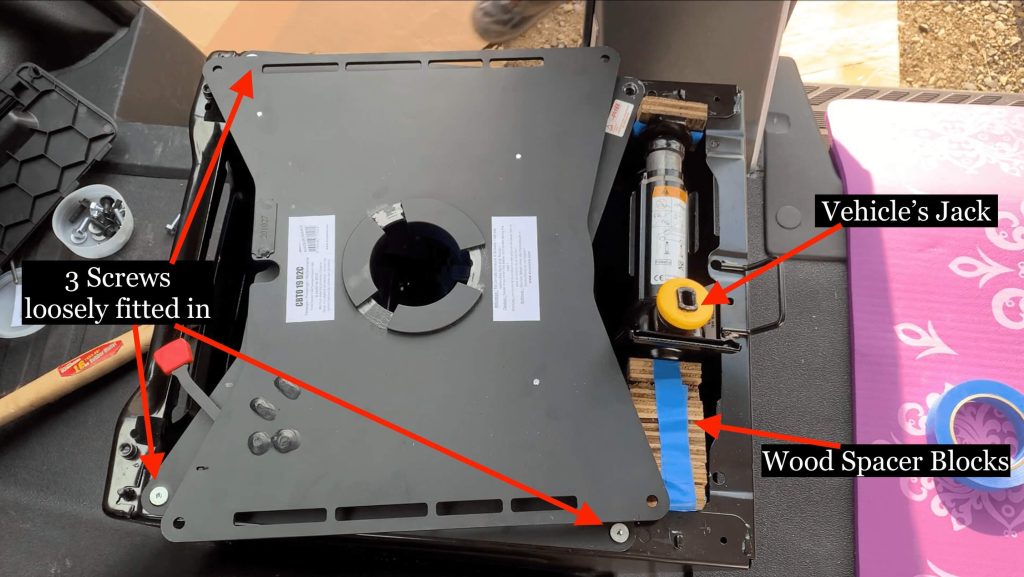
In the Ford Transit, the jack is located under the passenger seat when the passenger door is open.
Karma started by placing the jack horizontally inside the seat base.
However, the top part of the jack does not fit on the other side. He grabbed seven plywood blocks that happened to be lying around the garage and taped them together.
You can MacGyver any similar solution from your workspace. If you come up with something good, please tell us in the comments!
Again, please be careful here!
Step 6b
Place the top part of the jack toward the offending bolt. For us, it was the bolt closest to the seatbelt.
Place the blocks on the opposite side and expand the jack so that the base of the jack rests on the blocks in the middle. Expand it to hold.
Step 6c
Place the swivel seat back onto the seat base and loosely add the bolts to the three holes that worked fine.
Step 6d
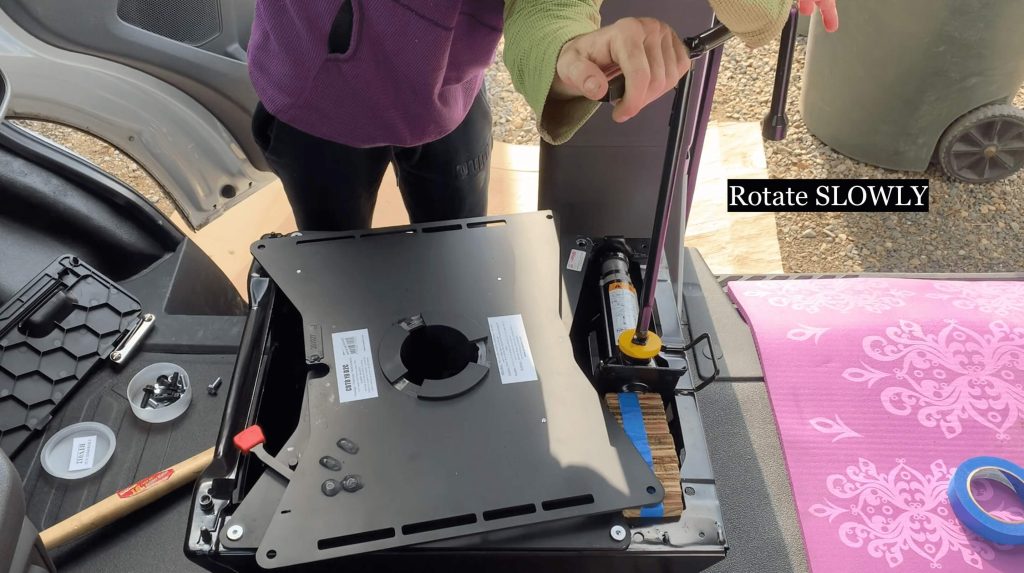
Very slowly and carefully expand the jack. Seriously…slowly. You do NOT want to harm the seat base welding. This is not a strength competition.
Watch the offending bolt hole as you carefully stretch the seat base with the jack. When you think they align, try hand screwing in the bolt. If it’s not ready, continue to expand slowly. If it’s ready, add the bolt and hand-tighten all four bolts as you would with tire lugs (alternately).
Step 7
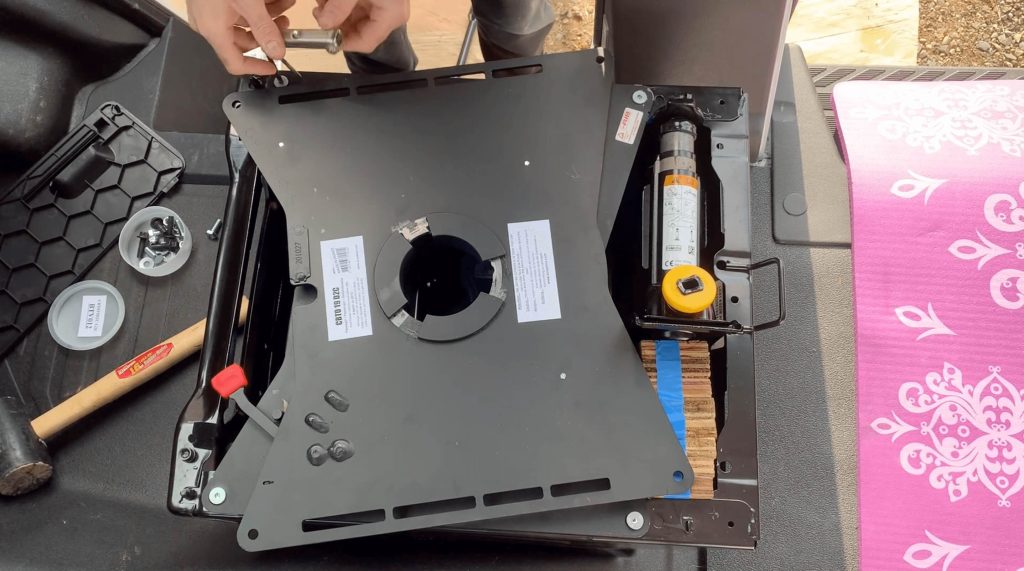
Tighten all the Scopema Swivel Seat bolts down with the Allen wrench.
**If you had to use the MacGyver method, wait to remove the jack until all four bolts can be tightened sufficiently. Then, remove the jack and blocks.
Step 8
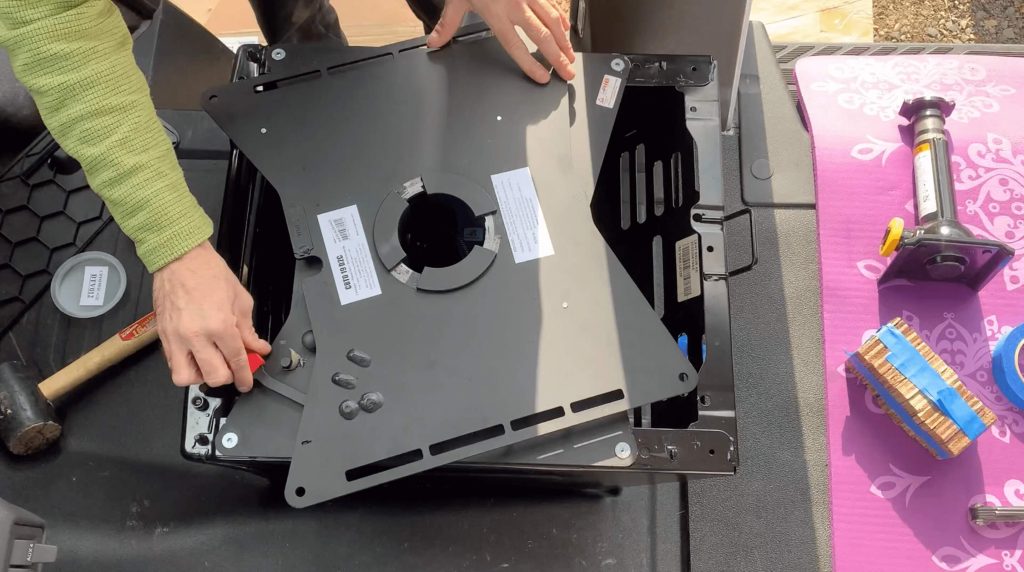
Rotate the top layer of the swivel seat to 45 degrees in order to properly access the screw holes for the seat (the passenger chair).
Align the seat screw holes with the upper Scopema Swivel Seat holes.
Use the other four bolts that came with the swivel seat to attach the seat to the swivel.
Do this by placing the bolt upward (head on the bottom) through the holes. Then, add the provided washer and nylon nut. Add these loosely until all four are in, then tighten them all.
Step 9
Re-attach the airbag underneath the seat using the 7mm socket.
Step 10
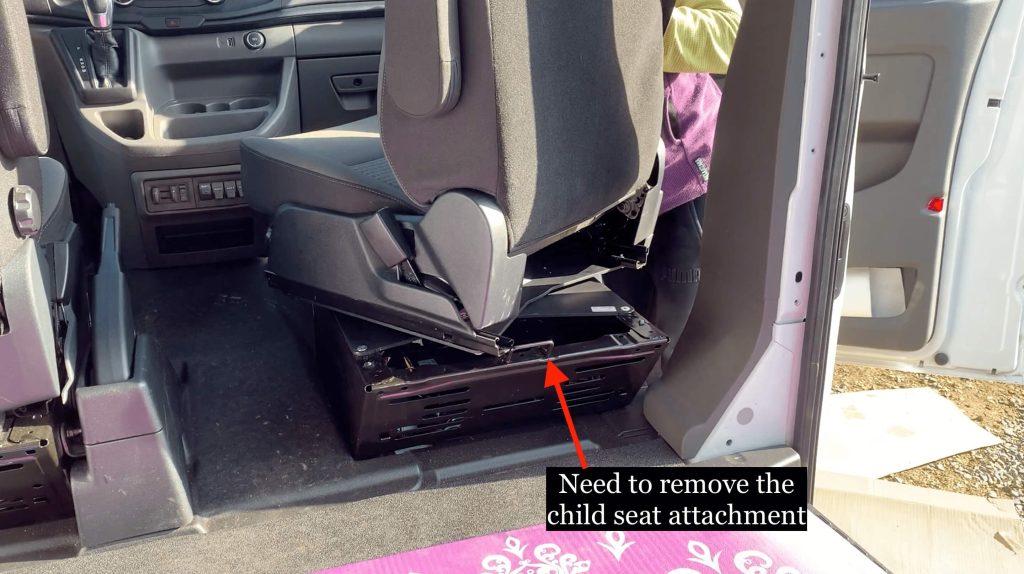
As you test the Scopema Swivel Seat, you will notice that the child seat attachment on the back blocks the path of the swivel seat as it rotates back.
Why is there a child seat attachment in a cargo van? I’m not sure.
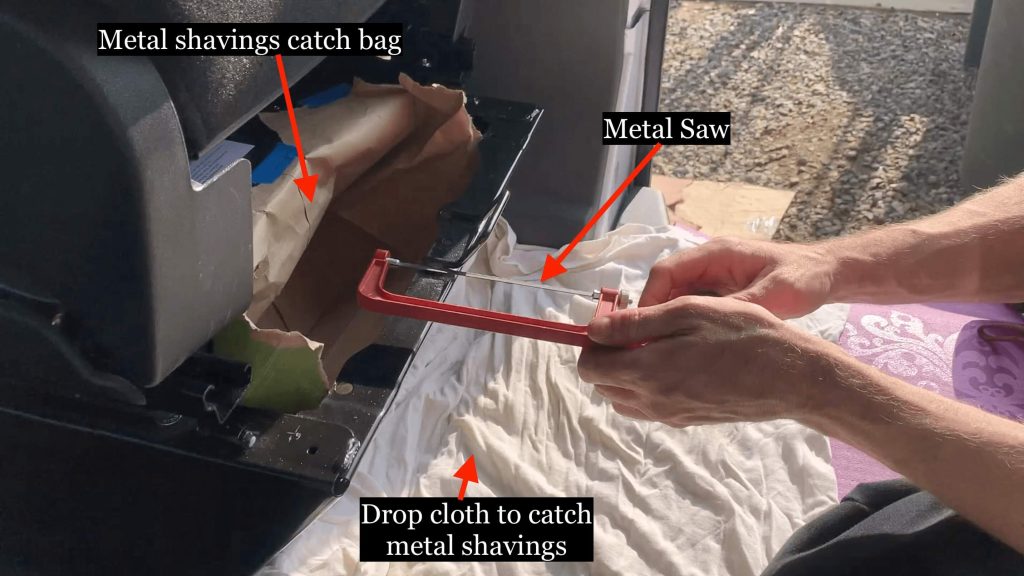
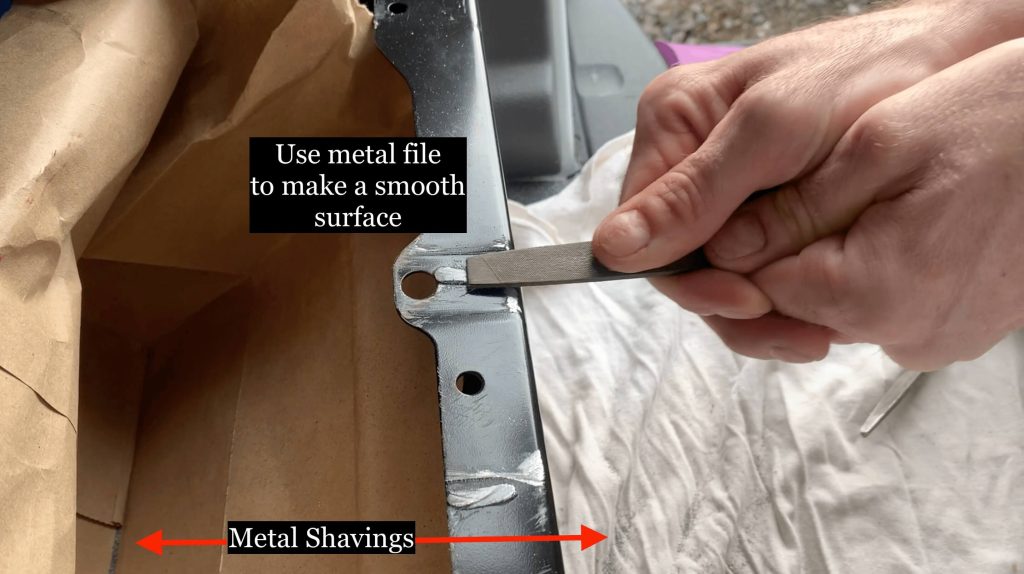
Remove the child seat attachment with a metal saw.
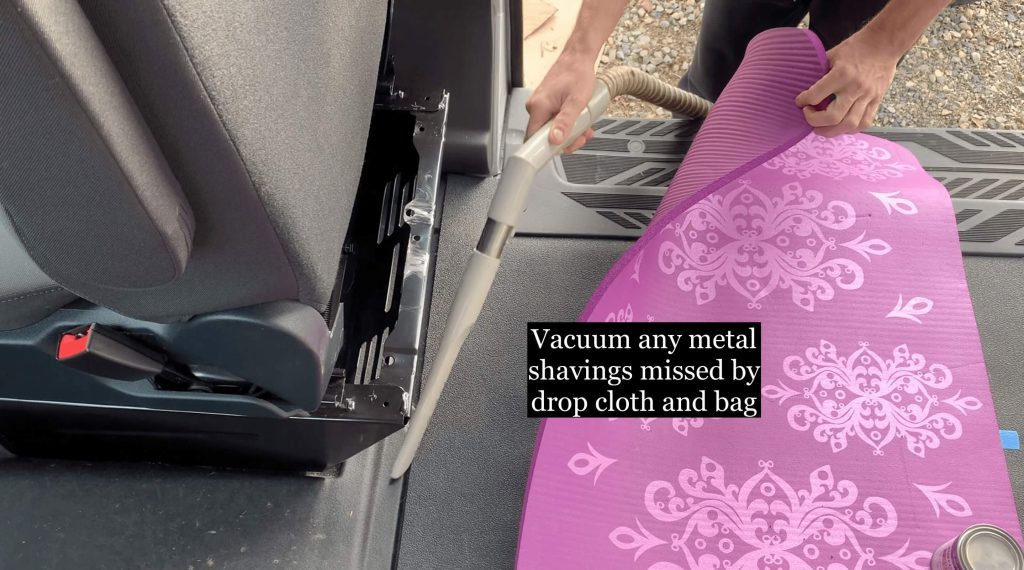
We placed a paper bag inside the seat and a drop cloth underneath to try and catch all the metal shavings. Do this by hand to avoid sparks in the van.
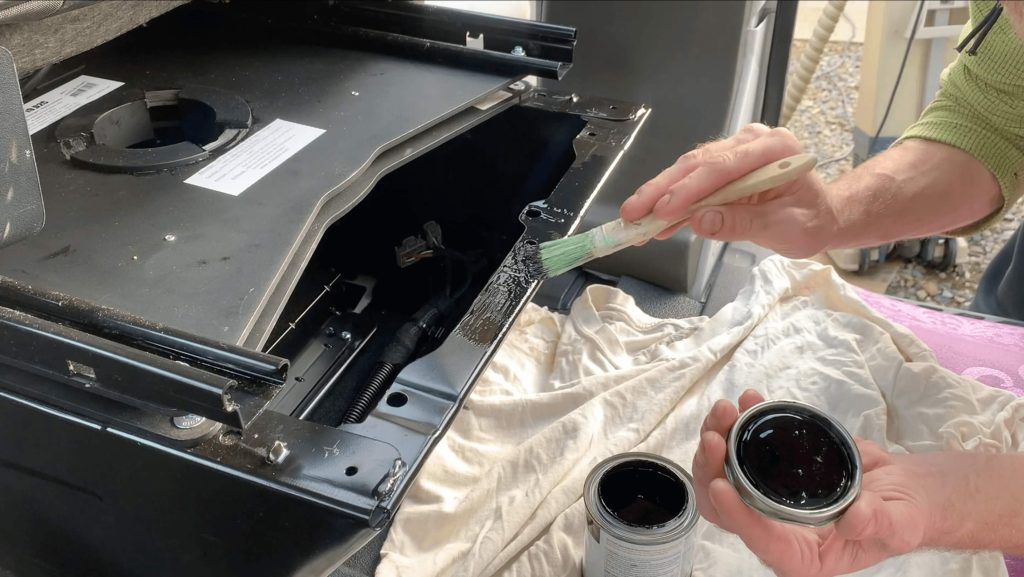
Once the hook was off, we filed it down with a metal file. Remove the bag and vacuum up the area to remove as many metal shavings as possible. Apply Rustoleum to the filed areas. Let dry.
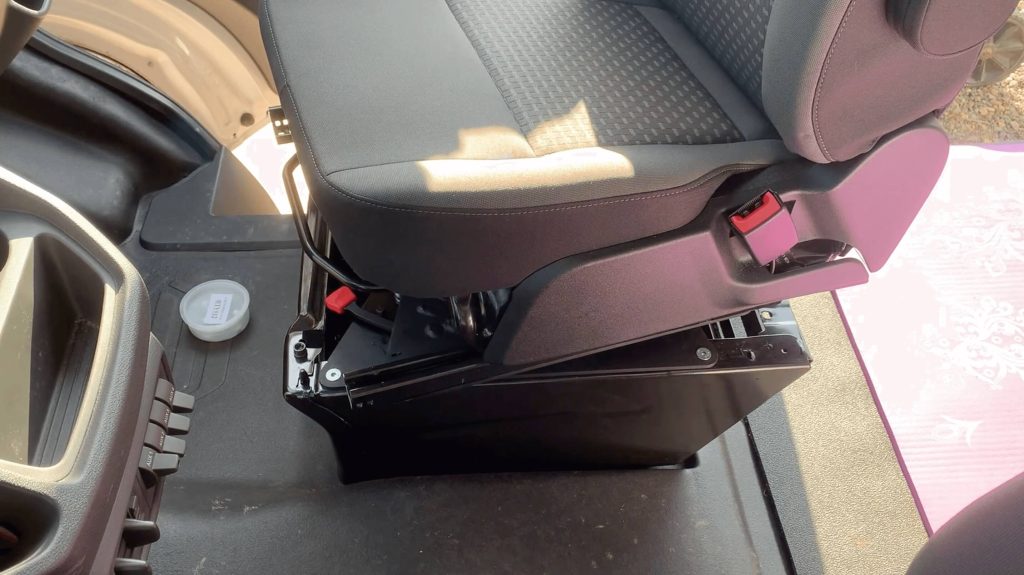
Annnnnd you’re done! Woohoo!
Overall Review of the Scopema Swivel Seat
Overall, the Scopema Swivel Seat was (relatively) easy to install.
While we had a minor hiccup based on the year of our Ford Transit, in comparison to other parts of the build, it was a simple fix.
As a short person who’s often navigating from the passenger seat, I liked that my feet could still touch the ground.
Furthermore, it shifts the space dynamic between “drive mode” with the seat forward and “camp mode” with the seat rotated.
For now, the only downside is that it does squeak a bit. Yes, we added the grease that came with it, but it still makes noise. It’s not enough to bother us, but it exists.
Scopema Swivel Seat: 3 Years Later Review
The Scopema Swivel Seat has held the test of time fantastically!
It is still secure, and all the bolts stayed in place despite our frequent long dirt road drives. We commonly go 5-20 miles down a dirt road with all the bumps.
Having the option to swivel the passenger seat changes the space options so much that we do it almost every time. Even if we’re on a long drive and take an hour break at a gas station, we’ll pause to swivel the seat.
Basically, the Scopema Swivel Seat gets used all the time.
We have noticed two minor downsides over the 3 years we’ve used it.
First, that squeak we mentioned above persists. Right at the start of the swivel, there’s a squeak. It’s still not significantly annoying us, and we ignore it.
Second, we’ve noticed that it’s better to open the passenger door a bit to make the swivel back or forward. If you leave the door closed, you must move the seat back and forth a bit more, and it will still scrape the plastic door liner. Essentially, it’s a pain to swivel it with the passenger door closed. We only do it if it’s super late, we’re pulling into a truck stop for the night, and we want to keep the doors locked.
My partner, Karma also made a “no BS” video how to install the seat here. You can view it below:
Additional Swivel Seat Resources We Used
Previously, I mentioned that we watched a few YouTube videos to aid our installation.
The more helpful, concise, but shaky installation video by VanRet49 helped us understand what to do. In this video, you can see what needs to be done and where things are located. It was helpful that he also had a 2020 Ford Transit. However, we did not use the drill to enlarge the holes of the swivel seat, nor did we use the grinder. We were uncomfortable with the sparks that flew in his installation. You can find that video here.
The second YouTube video we found was slower and more methodical. Dori and Mena explain each installation step carefully and show a lot of detail. But these two have a 2019 Ford Transit and didn’t have the hole lineup issue we had. This leads us to believe it may have been a 2020 problem. You can find their video here.
Final Thoughts
I HIGHLY recommend the Scopema Swivel seat in your DIY van build. Especially if you’re in a van with a smaller wheelbase, or you’re a couple in a van, or if you’re one person with a big dog.
The swivel seat opens the small living space, provides extra seating, and lets us keep our bed for relaxing only. I never want to bring work energy to our sleep space, so this gives us two “office” options in our van layout.
Lastly, it’s nice to see items built to last. The Scopema Swivel Seat is standing the test of time right now four years into our life on the road.